 |
|
Πετροχημική Βιομηχανία
Μερικές από τις πιο απαιτητικές εφαρμογές Μ.Κ.Ε. σε πετροχημικές βιομηχανίες παρουσιάζονται παρακάτω.
Background
Steel pipe is commonly manufactured using two basic methods. One is a continuous pour of molten metal which is pieced by a mandrel to create seamless pipe. The other is to roll plate steel into a cylindrical shape and weld it along the seam. The most common welding process used in the manufacturing of welded pipe is Electric Resistance Welding (ERW).
ERW pipe has inherent properties that make it susceptible to cracking. The cracking that occurs is predominately in the weld seam. Numerous catastrophic pipeline ruptures and explosions have occurred due to failure in the ERW seam. The Pipeline and Hazardous Materials Safety Administration (PHMSA) has issued mandates requiring inspection of in-service pipelines. This type of inspection is normally conducted using devices that are referred to as “Smart Pigs”, a cylindrical assembly containing test and data recording equipment that travels through the pipeline and continuously tests the pipe wall as it moves along.
Pigs that conduct inspection (Smart Pigs) use various NDT test modes including ultrasonics to assess the condition of the pipeline. Many smart pigs provide inspection results that must be followed up with conventional NDT inspection to evaluate and validate the findings, because while smart pigs can detect cracks in ERW seams, most cannot quantify the depth of the cracks. ERW seams can have indications that are collectively miles in length. Pipelines having evidence of cracking in the ERW seams are excavated and thoroughly inspected with various NDT means. This task could potentially involve miles of ERW indication validation.
Equipment
Phased Array UT using instruments like the Olympus Omniscan MX2 with appropriate probes can be used to scan ERW welds from the cylindrical OD orientation and can detect and quantify depth and length of cracking in the ERW seam. The WeldROVER fixture can be used to propel the PA UT angle beam probes down the length of the pipe.
Example
The two photgraphs picture below show the WeldROVER position on the ERW seam.
This screen capture show the OmniScan MX2 scan display with indications from EDM reference notches positioned in the ERW seam on both the OD and ID.
Conclusion
The results of the combined Olympus equipment applied to ERW seam evaluation has proven to be a huge asset to the pipeline owner/operators in their effort to determine if the pipeline is suitable for continued service. The Pipeline Research Council Inc (PRCI) has recognized this technology and a leader in assessing ERW seams on in-situ pipelines.
The WeldROVER and PA UT can be provided to companies interested in performing smart pig inspection validation. It is also applicable to various types of long seam welds such as double submerged arc welds in larger diameter pipe with heavier wall thickness.
Overview
Chlorine's unique chemical properties allow for numerous and varied applications. The primary use for chlorine is in the construction industry for the manufacture of polyvinyl chloride (PVC) - a product with flexibility, durability, dependability, versatility, and resistance to leakage, flame, corrosion, and microbial growth. PVC is typically about 55% chlorine.
Unfortunately, one of the downsides of PVC is its potential to cause harmful environmental side effects. When PVC is burned, hydrochloric acid and dioxin can be created and released to the environment. Some believe that before it actually burns, decomposing PVC can cause the most immediate threat to humans. This is of particular concern in building fires where PVC, used in the wiring and plumbing inside of walls, can overheat and decompose at lower temperatures - before there is actual ignition.
The greatest long-term threat from PVC is when it is recycled at the end of its useful life. Due to the wide range of additives and formulations that go into these products, testing for PVC is necessary to ensure that dioxin and toxic metals are not emitted into the air during recycling incineration.
In addition to PVC being a health hazard, the corrosive nature of the hydrochloric acid generated can seriously damage recycling equipment - including the metal and masonry in incinerators.
PVC also can adversely affect the quality of other recycled plastics, such as Polyethylene Terephthalate (PET), which greatly decreases the value of the recycled product. Recycling facilities need to separate out unwanted PVC containers. The detection of chlorine, which is typically in the 50+% range in PVC, is an ideal way to separate out the PVC from the other plastics.
Key Features of the Handheld XRF
The handheld, point-and-shoot XRF analyzer provides on-the-spot quality data about chlorine and facilitates high-throughput testing of materials. It identifies PVC and quantifies Cl content in as little as 3 seconds. In a 3-second sorting test, the detection limit is about 1% Cl.
This X-ray tube-based handheld XRF system replaces the need for multiple isotopes used in older systems and eliminates their burdensome radioactive source regulatory issues - particularly for interstate and international travel. The analyzer also quantifies Br, Sb, Ba, Zn and toxic metals such as Pb, Cd, Hg, Cr and As in seconds.

| Performance Parameters | |
| Typical Sorting Time PVC (sec) | 2-3 |
| Cl Detection Limit (%) | 1 |
| Analysis Testing Time (sec) | 30 |
| CI Detection Limit (%) | 0.35 |
On-the-Spot Chlorine (Cl) Analysis
Portable XRF technology offers simple and immediately accurate chlorine test results, non-destructively, at the point of use. Factory calibrations for Cl, Br, Sb, and 20+ metals provide concentrations in ppm or percent values. The user may also add new elements or create custom calibration curves at any time.
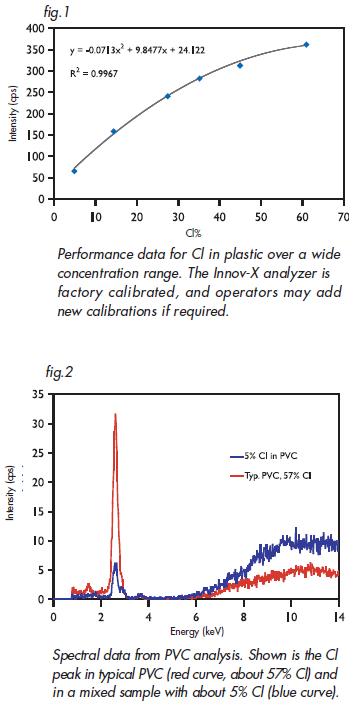
A typical Cl calibration curve in Figure 1 shows that the quadratic fit of data for Cl in plastic has an excellent R2 value of 0.9967. PVC is typically sorted with a 2-3 second test. A 5-second Fast Sorting LOD for Cl in PVC is about 1%.
For some applications, operators want to see lower level Cl concentrations by performing longer tests. The estimated limit of detection for Cl in PVC is 0.35% for a 30-second measurement (see Figure 2).
A portable XRF analyzer is an inexpensive, easy to use, preventative maintenance tool for in-situ analysis of chlorine in PVC. It also analyzes alloys and environmental samples, plus is used for numerous other materials analysis applications.
The portable XRF system is a proactive trouble-shooting tool to help indicate potential process and equipment problems before failures occur. It is non-destructive and can also be used as a cost-effective screening tool to save time and money by helping engineers determine which materials require further investigation - including thorough lab analysis.
Summary
Significant advancements have taken portable XRF technology to the next level for elemental analysis. Whether for fast sorting by non-technical operators, or customized analytical analysis in the lab, the portable XRF analyzer is affordable, easy to use, reliable, and overall cost effective.

This handheld portable tube-based analyzer incorporates state-of-the-art components including a battery operated miniature X-ray tube, a high-resolution silicon pin detector, high speed data acquisition circuitry, and an internal miniature PC for calculations, results, data storage and operator interface. The single "tube" design offers true simultaneous analysis of metals. It replaces the need for multiple isotopes used in other systems and eliminates their burdensome radioactive source regulatory issues, particularly for interstate travel.
The Importance of Weld Inspection
The quality of welds is becoming increasingly important as customer expectations rise. Products and components are expected to be of a high quality and not to fail unexpectedly.
Such failures have large financial and social consequences that can often be avoided with the proper inspection techniques.
Inspecting welds can also reduce costs by detecting defects in the early stages of manufacture, reducing the cost of customer returns and extending the life of components by detecting and correcting any defects.
Eddy Current Non Destructive Testing is a reliable, quick and inexpensive way to carry out preventative maintenance and ensure safety. Our eddy current equipment has a world-wide reputation for its reliability and accuracy, while our service and support ensure that you make the most of your equipment.
Eddy Current Testing on Welds
In welding inspection there is a need to detect surface breaking defects. For magnetic material e.g. carbon steel, generally magnetic particle inspection is used. However, eddy current inspection offers a number of advantages:
• No consumables used - e.g. ink & contrast paint.
• Ability to test areas with poor access.
• No surface preparation required - e.g. paint doesn't need to be removed, saving time in preparation for the inspection and in any recoating of surfaces .
• Improved sensitivity - ability to detect smaller defects using specially developed Weld Probes.
Weld Probes
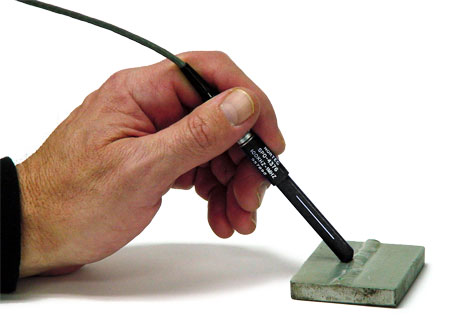
The Weld Probe has been specifically developed to check welds for cracks and corrosion. Examples of areas where it is currently used include:
• Offshore platforms
• Buildings
• Bridges
• Amusement park rides
• Ships, boats, submarines etc.
• Cranes
• Utility poles
• Aircraft
Weld Probes have been designed to be extremely hard-wearing so that they can handle the rough weld surface while still picking up any faults in the weld.

NECP-1152L 45° Stainless Shaft Weld Probe

General Description of the Application
Hydrogen-induced cracking (HIC) can occur in susceptible steels exposed to aqueous environments containing hydrogen sulphides. It is a form of hydrogen-related cracking and can have two distinct morphologies:
1. The first type is commonly referred to as hydrogen-induced cracking (HIC) and can occur where little or no applied or residual tensile stress exists. It is manifested as blisters or blister cracks oriented parallel to the plate surface.
2. The second type produces an array of blister cracks linked together in the through thickness direction by transgranular cleavage cracks. The latter type of cracking is referred to as stress-oriented hydrogen-induced cracking (SOHIC). SOHIC can have a greater effect on serviceability than HIC because it effectively reduces load carrying capabilities to a greater degree.
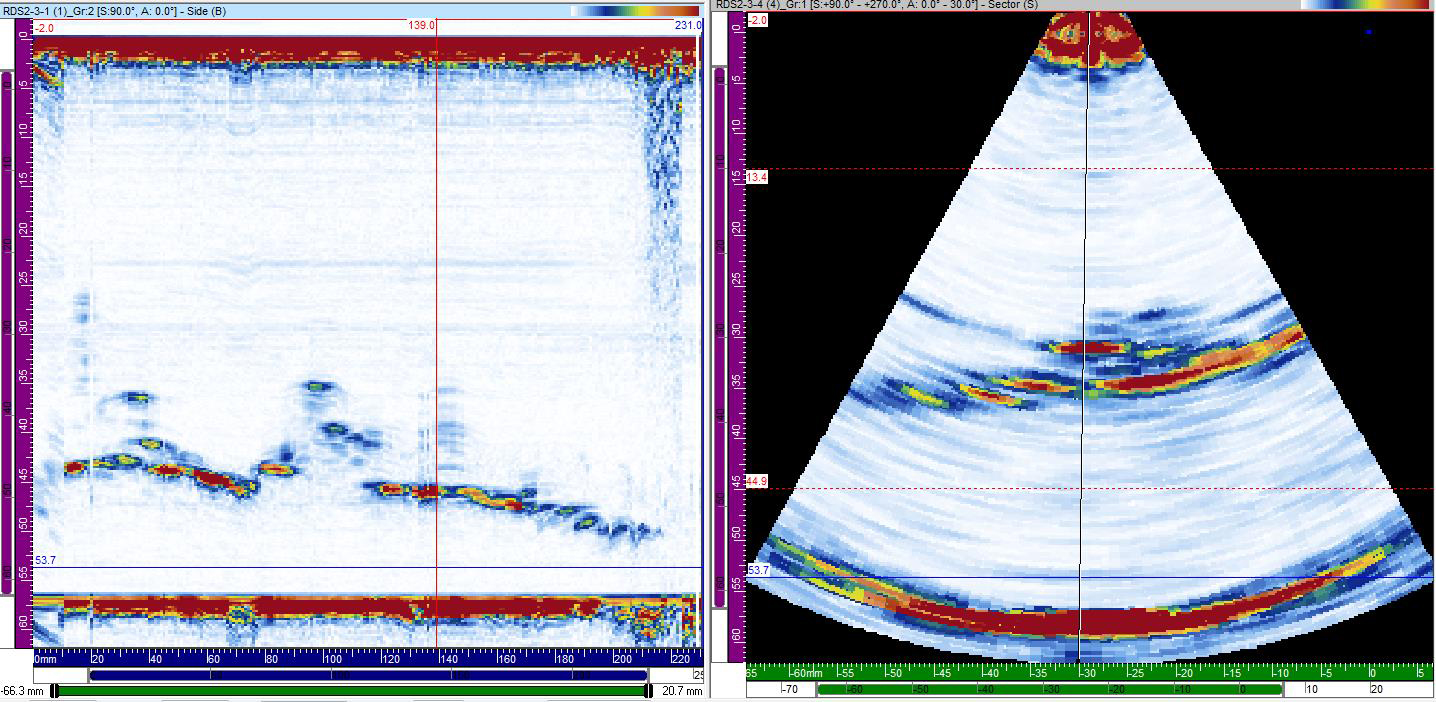
The inspection requires characterization of the defect areas to differentiate between spot inclusions, laminations, and different stages of hydrogen-induced cracking (HIC).
The benefit of electronic angle sweeping (S-scans) provided by the OmniScan™ allows simultaneous scanning from −30 to +30 degrees. The imaging from this scanning technique allows the user to distinguish between spot indications and interconnected defects.
Typical Inspection Requirements
- Heavy wall carbon steel vessels
- Thickness ranges of 10 mm (0.375 in.) to 150 mm (5.9 in.)
Advantages of Phased-Array Technique
- Imaging giving easy interpretation of links between defects
- Setup time between inspections decreased due to portability
Type of Defects
- Spot inclusions
- Laminations
- Side step cracking (SOHIC)
Description of the Solution
- Manual inspection using an OmniScan™ and phased-array probe
- Inspection setup using a −30- to +30-degree LW refracted angle sectorial scan
- Real-time display of A-scan and S-scan data
- Capable of storing display screen captures or full data file for analysis on computer-based software (TomoView™ or OmniPC)
Equipment Required
- OmniScan MX or OmniScan MX2 or OmniScan SX
- 5-MHz 16-element phased-array probe
- TomoView® or OmniPC software for analysis
Inspection Method
A 0-degree raster scan is used to find the area that has laminations. Then the phased array probe using the −30- to +30-degree S-scan setup is manually scanned over on the areas where defects have been found to determine if there is a link between those defects.
Screen shots and reports of the defect can be immediately created for later printouts.

Sample data of HIC on 55mm T Vessel
Ελ. Βενιζέλου 7 & Δελφών, 14452 Μεταμόρφωση, Αθήνα, Ελλάδα |


